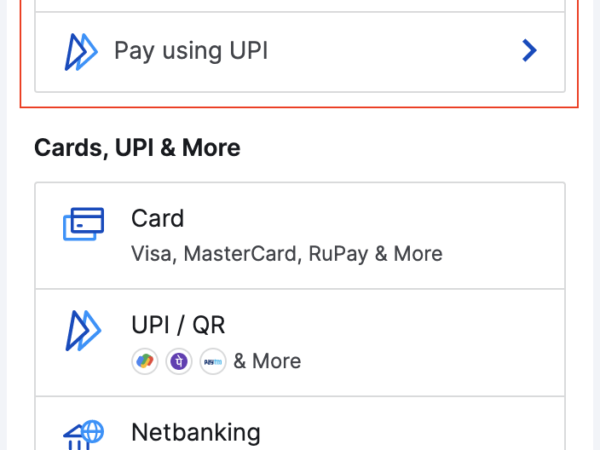
Razorpay payment gateway custom checkout
Sample codes to help you integrate the payment methods of your choice on Razorpay Checkout.
If you want to list all the payment methods offered by Axis bank, allow card payments for ICICI bank only and hide upi payment method from the Checkout, you can do so as follows:
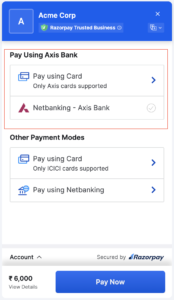
<html>
<button id="rzp-button1" class="btn btn-outline-dark btn-lg"><i class="fas fa-money-bill"></i> Own Checkout</button>
<script src="https://checkout.razorpay.com/v1/checkout.js"></script>
<script>
  var options = {
    "key": "[YOUR_KEY_ID]", // Enter the Key ID generated from the Dashboard
    "amount": "1000",
    "currency": "INR",
    "description": "Acme Corp",
    "image": "https://s3.amazonaws.com/rzp-mobile/images/rzp.jpg",
    "prefill":
    {
      "email": "gaurav.kumar@example.com",
      "contact": +919900000000,
    },
    config: {
      display: {
        blocks: {
          utib: { //name for Axis block
            name: "Pay using Axis Bank",
            instruments: [
              {
                method: "card",
                issuers: ["UTIB"]
              },
              {
                method: "netbanking",
                banks: ["UTIB"]
              },
            ]
          },
          other: { //  name for other block
            name: "Other Payment modes",
            instruments: [
              {
                method: "card",
                issuers: ["ICIC"]
              },
              {
                method: 'netbanking',
              }
            ]
          }
        },
        hide: [
          {
          method: "upi"
          }
        ],
        sequence: ["block.utib", "block.other"],
        preferences: {
          show_default_blocks: false // Should Checkout show its default blocks?
        }
      }
    },
    "handler": function (response) {
      alert(response.razorpay_payment_id);
    },
    "modal": {
      "ondismiss": function () {
        if (confirm("Are you sure, you want to close the form?")) {
          txt = "You pressed OK!";
          console.log("Checkout form closed by the user");
        } else {
          txt = "You pressed Cancel!";
          console.log("Complete the Payment")
        }
      }
    }
  };
  var rzp1 = new Razorpay(options);
  document.getElementById('rzp-button1').onclick = function (e) {
    rzp1.open();
    e.preventDefault();
  }
</script>
</html>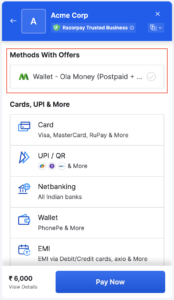
Show Ola Money Separately on Checkout
Use the code given below to show Ola Money separately on Checkout:
config: {
    display: {
      blocks: {
        banks: {
          name: 'Methods with Offers',
          instruments: [
            {
              method: 'wallet',
              wallets: ['olamoney']
            }]
        },
      },
      sequence: ['block.banks'],
      preferences: {
        show_default_blocks: true,
      },
    },
  },
};
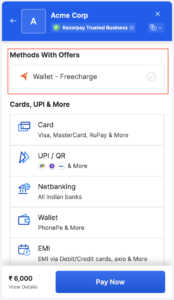
Show Freecharge Separately on Checkout
Use the code given below to show Freecharge separately on Checkout:
config: {
    display: {
      blocks: {
        banks: {
          name: 'Methods with Offers',
          instruments: [
            {
              method: 'wallet',
              wallets: ['freecharge']
            }]
        },
      },
      sequence: ['block.banks'],
      preferences: {
        show_default_blocks: true,
      },
    },
  },
};
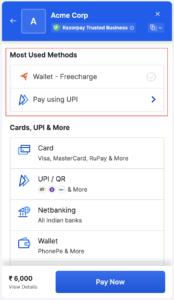
Show Most Used Methods
Use the code given below to show methods with offers:
config: {
    display: {
      blocks: {
        banks: {
          name: 'Most Used Methods',
          instruments: [
            {
              method: 'wallet',
              wallets: ['freecharge']
            },
            {
                method: 'upi'
            },
            ],
        },
      },
      sequence: ['block.banks'],
      preferences: {
        show_default_blocks: true,
      },
    },
  },
};
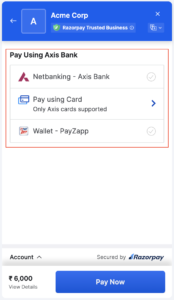
Show Instruments of a Certain Bank Only
Use the code given below to show the instruments of a certain bank only on Checkout:
config: {
    display: {
      blocks: {
        banks: {
          name: 'Pay using Axis bank',
          instruments: [
            {
              method: 'netbanking',
              banks: ['UTIB'],
            },
            {
              method: 'card',
              issuers: ['UTIB'],
            },
            {
                method: 'wallet',
                wallets:['payzapp']
            }
          ],
        },
      },
      sequence: ['block.banks'],
      preferences: {
        show_default_blocks: false,
      },
    },
  },
};
Highlight Instruments of a Certain Bank
Use the code given below to highlight the instruments of a certain bank only on Checkout:
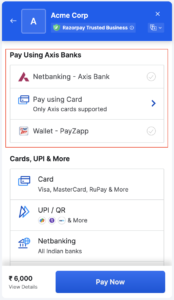
config: {
    display: {
      blocks: {
        banks: {
          name: 'Pay using Axis banks',
          instruments: [
            {
              method: 'netbanking',
              banks: ['UTIB'],
            },
            {
              method: 'card',
              issuers: ['UTIB'],
            },
            {
                method: 'wallet',
                wallets:['payzapp']
            }
          ],
        },
      },
      sequence: ['block.banks'],
      preferences: {
        show_default_blocks: true,
      },
    },
  },
};
Reorder Payment Methods
Use the code given below to reorder payment methods on Checkout:
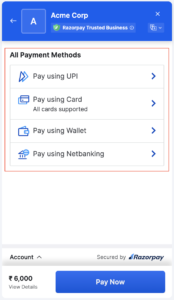
config: {
    display: {
      blocks: {
        banks: {
          name: 'All payment methods',
          instruments: [
            {
              method: 'upi'
            },
            {
              method: 'card'
            },
            {
                method: 'wallet'
            },
            {
                method: 'netbanking'
            }
          ],
        },
      },
      sequence: ['block.banks'],
      preferences: {
        show_default_blocks: false,
      },
    },
  },
};
Remove a Method from Checkout
Use the code given below to remove a method from Checkout:
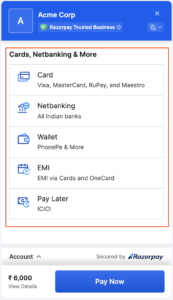
config: {
    display: {
      hide: [
        {
          method: 'upi'
        }
      ],
      preferences: {
        show_default_blocks: true,
      },
    },
  },
};
Show Only a Certain Payment Method on Checkout
Use the code given below to show only a certain payment method on Checkout:
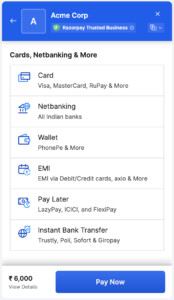
config: {
    display: {
      blocks: {
        banks: {
          name: 'Pay via UPI',
          instruments: [
            {
              method: 'upi'
            }
          ],
        },
      },
      sequence: ['block.banks'],
      preferences: {
        show_default_blocks: false,
      },
    },
  },
};
Card
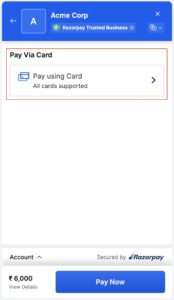
config: {
    display: {
      blocks: {
        banks: {
          name: 'Pay via Card',
          instruments: [
            {
              method: 'card'
            }
          ],
        },
      },
      sequence: ['block.banks'],
      preferences: {
        show_default_blocks: false,
      },
    },
  },
};Paytm Payment Gateway Integration in PHP
In this tutorial, we have explained Paytm Payment Gateway Integration in PHP programming language. In today scenario Paytm is the most popular and trusted mobile wallet system. As per the Economic time’s survey Paytm reached approx 200 million registered users. Yes, that is a huge number.
After demonetization in India, Paytm become more popular. Now, most of the users pay Bills and transfer money via the Paytm service. It’s very easy to use and of course very fast.
Today many eCommerce or other service websites start using Paytm payment gateway. Its also reduce the risk to exposing credit card details or banking password. Just send or receive payment via your Mobile Phone. So, no doubt Paytm is a better service for online payment for your Website or Mobile App.
Steps to Integrate Paytm Payment Gateway in PHP
Let’s start the process of Paytm Payment Gateway Integration. It’s very easy to integrate in your application as compared to other payment gateways. Follow the below steps:
Step 1 : Register for Paytm Account
Sign Up for a Paytm business account from here: https://paytm.com/business/payments/online
During Sign up process, you need to choose the option that Paytm Payment Gateway requires for a Website or APP. Also submit a valid Redirect URL, where you want to redirect the user after successful payment received.
In the registration process, they ask for some official information like Business Types, addresses, Verification proof, Bank Details, etc. Although you can get Paytm sandbox credential without complete this process. But for production, you have to provide all required information.
After this, you will get Paytm Staging Credentials, which included Staging MID, Merchant Key, Industry Type, Website Name, and Channel ID. Paytm also send testing wallet details, which you can use for test transaction flow.
Note: All users must use Paytm with only an Indian registered number because the company hasn’t gone overseas except for Canada.
Step 2 : Download Official Paytm PHP Kit
Paytm official announced library source code in all languages. Just download Paytm Payment Gateway kit in PHP from GitHub. Extract the Zip file, there is the ‘PaytmKit’ folder which has all required files.
Step 3: Configure Paytm Credential
Open ‘config_paytm.php’ file in PaytmKit -> lib folder and update with the access credential you got from Paytm.
define('PAYTM_ENVIRONMENT', 'TEST'); // change value PROD for production
define('PAYTM_MERCHANT_KEY', 'vsbi51****uKL0#3 ');
define('PAYTM_MERCHANT_MID', 'codefi*****858443');
define('PAYTM_MERCHANT_WEBSITE', 'WEBS***ING');
By default source code ready for staging site. When you want to move to Production update the ‘PAYTM_ENVIRONMENT’ value by ‘PROD’.
Step 4: Create HTML Payment Form
After configuring the credential, your code is ready to process. Now create an HTML form to make the online transactions.
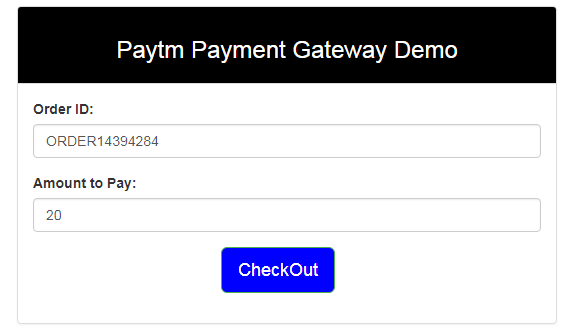
Form action should be to this file ‘pgRedirect.php’ inside PaytmKit folder. This file handle checksum and other require details and redirect to you Paytm payment page. After click on checkout button user can process the payment via the paytm wallet.
<!doctype html>
<html>
<head>
<title>Patym Payment Gateway Integration in PHP</title>
    <link href="https://maxcdn.bootstrapcdn.com/bootstrap/3.3.7/css/bootstrap.min.css" type="text/css" rel="stylesheet" />
</head>
<body>
<div class="container" style="padding-top:100px;">
    <div class="col-xs-6 col-xs-offset-3">
        <div class="panel panel-default">
            <div style="background-color: #000000; color:#fff" class="panel-heading">
                <h3 class="text-center">Paytm Payment Gateway Demo</h3>
            </div>
            <div class="panel-body">
            <form action="pgRedirect.php" method="post">
				<input type="hidden" id="CUST_ID" name="CUST_ID" value="CUST001">
					<input type="hidden" id="INDUSTRY_TYPE_ID" name="INDUSTRY_TYPE_ID" value="Retail">
					<input type="hidden"  id="CHANNEL_ID" name="CHANNEL_ID" value="WEB">
                <div class="form-group">

					<label>Order ID:</label>
                    <input type="text" class="form-control" id="ORDER_ID" name="ORDER_ID" size="20" maxlength="20" autocomplete="off"

tabindex="1" value="<?php echo  "ORDER" . rand(10000,99999999)?>">
                </div>

                <div class="form-group">
					<label>Amount to Pay:</label>
                    <input type="text" class="form-control" id="TXN_AMOUNT" name="TXN_AMOUNT" autocomplete="off" tabindex="5"

value="20">
                </div>
                <div class="form-group">
                    <input type="submit" name="submit" value="CheckOut" class="btn btn-success btn-lg" style="background-

color:#0000FF; margin-left: 37%;">
                </div>
            </form>
            </div>
        </div>
    </div>
</div>
</body>
</html>
In this form we are sending some required parameter as hidden variable like Channel ID, Industry Type and Customer ID. You have to pass these parameters along with form submit.
Razorpay payment gateway integration in PHP
create a folder inside the root directory of your local server.
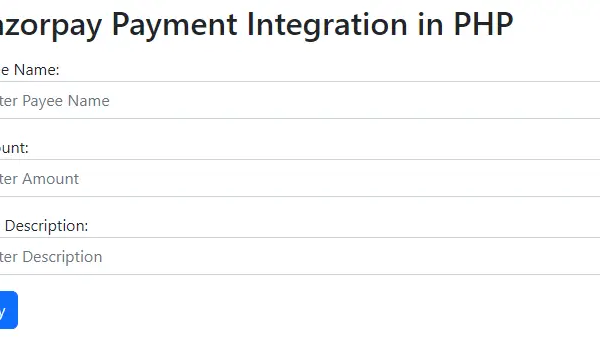
create a file (index.php) inside that folder along with some inputs such as payee name, amount, and item description as shown below
<!DOCTYPE html>
<html lang="en">
<head>
  <title>Razorpay</title>
  <meta charset="utf-8">
  <meta name="viewport" content="width=device-width, initial-scale=1">
  <link href="https://cdn.jsdelivr.net/npm/bootstrap@5.2.3/dist/css/bootstrap.min.css" rel="stylesheet">
  <script src="https://cdn.jsdelivr.net/npm/bootstrap@5.2.3/dist/js/bootstrap.bundle.min.js"></script>
</head>
<body>

<div class="container mt-3" style="width: 50%;">
  <h2>Razorpay Payment Integration in PHP</h2>
  <form action="#">
    <div class="mb-3 mt-3">
      <label for="email">Payee Name:</label>
      <input type="email" class="form-control" id="name" placeholder="Enter Payee Name" name="payee_name">
    </div>
    <div class="mb-3">
      <label for="pwd">Amount:</label>
      <input type="number" class="form-control" id="amount" placeholder="Enter Amount" name="amount">
    </div>
    <div class="mb-3">
      <label for="pwd">Item Description:</label>
      <input type="text" class="form-control" id="description" placeholder="Enter Description" name="description">
    </div>
    <button type="button" class="btn btn-primary" id="rzp-button1" onclick="pay_now()">Pay</button>
  </form>
</div>
</body>
</html>
Paste the javascript code inside the index.php file as shown below
<script src="https://code.jquery.com/jquery-3.6.1.min.js"></script>
<script src="https://checkout.razorpay.com/v1/checkout.js"></script>
<script type="text/javascript">
    function pay_now(){
          //get the input from the form
          var name = $("#payee_name").val();
          var amount = $("#amount").val();
          var actual_amount = amount*100;
          var description = $('#description').val();
          //var actual_amount = amount;
          var options = {
            "key": "rzp_test_xx28KfXBaypeQW", // Enter the Key ID generated from the Dashboard
            "amount": actual_amount, // Amount is in currency subunits. Default currency is INR. Hence, 50000 refers to 50000 paise
            "currency": "INR",
            "name": name,
            "description": description,
            "image": "razorpay.png",
            //"order_id": "order_IluGWxBm9U8zJ8", //This is a sample Order ID. Pass the `id` obtained in the response of Step 1
            "handler": function (response){
                console.log(response);
                $.ajax({

                    url: 'process_payment.php',
                    'type': 'POST',
                    'data': {'payment_id':response.razorpay_payment_id,'amount':actual_amount,'name':name},
                    success:function(data){
                        console.log(data);
                      window.location.href = 'thank_you.php';
                    }

                });
                // alert(response.razorpay_payment_id);
                // alert(response.razorpay_order_id);
                // alert(response.razorpay_signature)
            },

        };
        var rzp1 = new Razorpay(options);
        rzp1.on('payment.failed', function (response){
                alert(response.error.code);
                alert(response.error.description);
                alert(response.error.source);
                alert(response.error.step);
                alert(response.error.reason);
                alert(response.error.metadata.order_id);
                alert(response.error.metadata.payment_id);
        });
        document.getElementById('rzp-button1').onclick = function(e){
            rzp1.open();
            e.preventDefault();
        }
    }
</script>
Establish the database connection in PHP so that you can insert the data with the Razorpay payment id.
Create a table in your database as shown below
DDL information of the table
CREATE TABLE razorpay_payment (
id int(10) NOT NULL AUTO_INCREMENT,
name varchar(50) COLLATE utf8mb4_unicode_ci NOT NULL,
amount int(10) NOT NULL,
payment_status varchar(50) COLLATE utf8mb4_unicode_ci NOT NULL,
payment_id varchar(100) COLLATE utf8mb4_unicode_ci NOT NULL,
paid_on datetime NOT NULL,
PRIMARY KEY (id)
) ENGINE=MyISAM DEFAULT CHARSET=utf8mb4 COLLATE=utf8mb4_unicode_ci
Create a file process_payment.php to submit the payment details inside the database after successful payment.
<!DOCTYPE html>
<html lang="en">
<head>
  <title>Razorpay</title>
  <meta charset="utf-8">
  <meta name="viewport" content="width=device-width, initial-scale=1">
  <link href="https://cdn.jsdelivr.net/npm/bootstrap@5.2.3/dist/css/bootstrap.min.css" rel="stylesheet">
  <script src="https://cdn.jsdelivr.net/npm/bootstrap@5.2.3/dist/js/bootstrap.bundle.min.js"></script>
</head>
<body>

<div class="container mt-3" style="width: 50%;">
  <h2>Razorpay Payment Integration in PHP</h2>
  <form action="#">
    <div class="mb-3 mt-3">
      <label for="email">Payee Name:</label>
      <input type="email" class="form-control" id="name" placeholder="Enter Payee Name" name="payee_name">
    </div>
    <div class="mb-3">
      <label for="pwd">Amount:</label>
      <input type="number" class="form-control" id="amount" placeholder="Enter Amount" name="amount">
    </div>
    <div class="mb-3">
      <label for="pwd">Item Description:</label>
      <input type="text" class="form-control" id="description" placeholder="Enter Description" name="description">
    </div>
    <button type="button" class="btn btn-primary" id="rzp-button1" onclick="pay_now()">Pay</button>
  </form>
</div>

</body>
</html>
<script src="https://code.jquery.com/jquery-3.6.1.min.js"></script>
<script src="https://checkout.razorpay.com/v1/checkout.js"></script>
<script type="text/javascript">
    function pay_now(){
          //get the input from the form
          var name = $("#payee_name").val();
          var amount = $("#amount").val();
          var actual_amount = amount*100;
          var description = $('#description').val();
          //var actual_amount = amount;
          var options = {
            "key": "rzp_test_xx28KfXBaypeQW", // Enter the Key ID generated from the Dashboard
            "amount": actual_amount, // Amount is in currency subunits. Default currency is INR. Hence, 50000 refers to 50000 paise
            "currency": "INR",
            "name": name,
            "description": description,
            "image": "razorpay.png",
            //"order_id": "order_IluGWxBm9U8zJ8", //This is a sample Order ID. Pass the `id` obtained in the response of Step 1
            "handler": function (response){
                console.log(response);
                $.ajax({

                    url: 'process_payment.php',
                    'type': 'POST',
                    'data': {'payment_id':response.razorpay_payment_id,'amount':actual_amount,'name':name},
                    success:function(data){
                        console.log(data);
                      window.location.href = 'thank_you.php';
                    }

                });
                // alert(response.razorpay_payment_id);
                // alert(response.razorpay_order_id);
                // alert(response.razorpay_signature)
            },

        };
        var rzp1 = new Razorpay(options);
        rzp1.on('payment.failed', function (response){
                alert(response.error.code);
                alert(response.error.description);
                alert(response.error.source);
                alert(response.error.step);
                alert(response.error.reason);
                alert(response.error.metadata.order_id);
                alert(response.error.metadata.payment_id);
        });
        document.getElementById('rzp-button1').onclick = function(e){
            rzp1.open();
            e.preventDefault();
        }
    }
</script>
Explanation of the above code:-
- As soon as the form is submitted, we will get the input values using jquery and pass them to the options variable along with the key ID generated from the Razorpay dashboard.
- When you pass the input values using jquery then do not forget to multiply the amount by 100 because the currency is INR which means you are putting the amount as paisa which is why you need to multiply by 100.
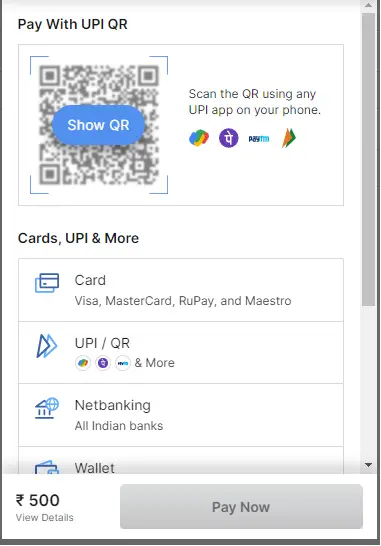
- Now, you will see a Razorpay interface after giving the phone number and email as shown below. Here you can view various options for payments.
Now, inside the handler function, if you console the response then you will see the response values as shown below. Note that when you console then comment on the ajax request otherwise you can not see the response on the console.
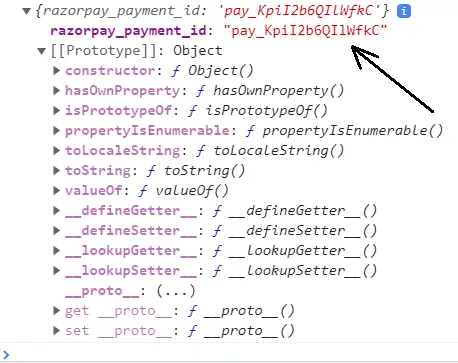
Now we will use the razorpay_payment_id shown on the console and send it with the amount and payee name in the ajax request to the URL: process_payment.php.
Now, in the process_payment.php file, include your database connection file (dbconnect.php) as shown below
<?php
$servername='localhost';
$username="root";
$password="";
try
{
    $con=new PDO("mysql:host=$servername;dbname=myproject_db",$username,$password);
    $con->setAttribute(PDO::ATTR_ERRMODE,PDO::ERRMODE_EXCEPTION);
    //echo 'connected';
}
catch(PDOException $e)
{
    echo '<br>'.$e->getMessage();
}
?>
Now, inside the process_payment.php, get the razorpay_payment_id and other data sent from the ajax request and save them in the MySQL database as shown below
<?php
//connect the database
include 'dbconnect.php';

//get the payment details from payment page

if(isset($_POST['payment_id']) && isset($_POST['amount']) && isset($_POST['name']))
{
    $paymentId = $_POST['payment_id'];
    $amount = $_POST['amount'];
    $name = $_POST['name'];

    //insert data into database
    $sql="INSERT INTO razorpay_payment(name,amount,payment_status,payment_id)VALUES('$name','$amount','paid','$paymentId')";
    $stmt=$con->prepare($sql);
    $stmt->execute();
}
?>
Now, inside the success function, you can redirect to a thank you page after successful payment as shown below.
window.location.href = 'thank_you.php';
<!DOCTYPE html>
<html lang="en">
<head>
  <title>Bootstrap Example</title>
  <meta charset="utf-8">
  <meta name="viewport" content="width=device-width, initial-scale=1">
  <link href="https://cdn.jsdelivr.net/npm/bootstrap@5.2.3/dist/css/bootstrap.min.css" rel="stylesheet">
  <script src="https://cdn.jsdelivr.net/npm/bootstrap@5.2.3/dist/js/bootstrap.bundle.min.js"></script>
</head>
<body>

<div class="container mt-3">
  <div class="alert alert-success alert-dismissible">
    <button type="button" class="btn-close" data-bs-dismiss="alert"></button>
    <strong>Success!</strong> Payment Paid Successfully.
  </div>
</div>

</body>
</html>
