PayPage – PHP ready to use Payment Gateway Integrations
PayPage For WordPress is Now Available

PayPage – PHP ready to use Payment Gateway Integrations
Since, last ten years we are working as the freelancer to provide the software solutions in the form of products & Services to our clients. During this period we faced lots of difficulties to managing payment gateways for our products and services.
So, to achieve all these things we are created PayPage script. Using this script you can manage the many payment gateways using one codebase. Also you can use these payment gateways in shopping cart, Invoice billing, bill payments like other e-commerce website as per your convenience.
PayPage is a payment gateways integration script built in PHP. It provides a facility to integrate payment gateways like PayPal, PayPal Checkout, PayTM, Instamojo, Paystack, Stripe, Stripe Support for Card | iDeal | BanContact | Giropay | P24 | EPS, Razorpay, Authorize.Net, Iyzico, CoinGate (Bitcoin, Crypto currency), mercado pago (mercadopago), RavePay by FLUTTERWAVE and PagSeguro. It is the best solution to integrate these all payment gateways in your PHP application in minimum time.
It is a multi-payment gateway processing library that provides a simple and easy implementation to integrate payment gateways in your website. It provides flexibility to write code for given payment gateway integration from one place. You can easily test all payment gateways in test mode and production mode. Also able to integrate this product in any PHP based website.
Features at Glance
- Built Using PHP
- Bootstrap based example page
- Responsive Layout.
- Ready & Easy to Use
- Well documented.
- User friendly UI
- Ready to integrate in any applications
- Support for Crypto Currency (Bitcoin etc) using CoinGate
- Many Payment Gateways including gateways for India, Africa & Turkey
- Easy to test payment gateways on test & production mode.
- And many More Features It’s worth to check the demo!
Server Requirements:
- PHP >= 7.3
- Authorize.Net would require PHP 8 and up
- OpenSSL PHP Extension
- Mbstring PHP Extension
- JSON PHP Extension
- Curl PHP Extension
Razorpay payment gateway integration in PHP
create a folder inside the root directory of your local server.
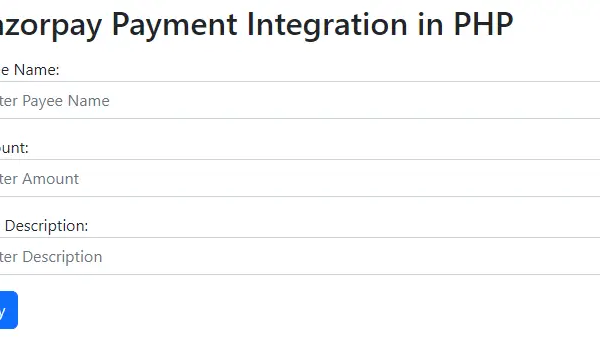
create a file (index.php) inside that folder along with some inputs such as payee name, amount, and item description as shown below
<!DOCTYPE html>
<html lang="en">
<head>
  <title>Razorpay</title>
  <meta charset="utf-8">
  <meta name="viewport" content="width=device-width, initial-scale=1">
  <link href="https://cdn.jsdelivr.net/npm/bootstrap@5.2.3/dist/css/bootstrap.min.css" rel="stylesheet">
  <script src="https://cdn.jsdelivr.net/npm/bootstrap@5.2.3/dist/js/bootstrap.bundle.min.js"></script>
</head>
<body>

<div class="container mt-3" style="width: 50%;">
  <h2>Razorpay Payment Integration in PHP</h2>
  <form action="#">
    <div class="mb-3 mt-3">
      <label for="email">Payee Name:</label>
      <input type="email" class="form-control" id="name" placeholder="Enter Payee Name" name="payee_name">
    </div>
    <div class="mb-3">
      <label for="pwd">Amount:</label>
      <input type="number" class="form-control" id="amount" placeholder="Enter Amount" name="amount">
    </div>
    <div class="mb-3">
      <label for="pwd">Item Description:</label>
      <input type="text" class="form-control" id="description" placeholder="Enter Description" name="description">
    </div>
    <button type="button" class="btn btn-primary" id="rzp-button1" onclick="pay_now()">Pay</button>
  </form>
</div>
</body>
</html>
Paste the javascript code inside the index.php file as shown below
<script src="https://code.jquery.com/jquery-3.6.1.min.js"></script>
<script src="https://checkout.razorpay.com/v1/checkout.js"></script>
<script type="text/javascript">
    function pay_now(){
          //get the input from the form
          var name = $("#payee_name").val();
          var amount = $("#amount").val();
          var actual_amount = amount*100;
          var description = $('#description').val();
          //var actual_amount = amount;
          var options = {
            "key": "rzp_test_xx28KfXBaypeQW", // Enter the Key ID generated from the Dashboard
            "amount": actual_amount, // Amount is in currency subunits. Default currency is INR. Hence, 50000 refers to 50000 paise
            "currency": "INR",
            "name": name,
            "description": description,
            "image": "razorpay.png",
            //"order_id": "order_IluGWxBm9U8zJ8", //This is a sample Order ID. Pass the `id` obtained in the response of Step 1
            "handler": function (response){
                console.log(response);
                $.ajax({

                    url: 'process_payment.php',
                    'type': 'POST',
                    'data': {'payment_id':response.razorpay_payment_id,'amount':actual_amount,'name':name},
                    success:function(data){
                        console.log(data);
                      window.location.href = 'thank_you.php';
                    }

                });
                // alert(response.razorpay_payment_id);
                // alert(response.razorpay_order_id);
                // alert(response.razorpay_signature)
            },

        };
        var rzp1 = new Razorpay(options);
        rzp1.on('payment.failed', function (response){
                alert(response.error.code);
                alert(response.error.description);
                alert(response.error.source);
                alert(response.error.step);
                alert(response.error.reason);
                alert(response.error.metadata.order_id);
                alert(response.error.metadata.payment_id);
        });
        document.getElementById('rzp-button1').onclick = function(e){
            rzp1.open();
            e.preventDefault();
        }
    }
</script>
Establish the database connection in PHP so that you can insert the data with the Razorpay payment id.
Create a table in your database as shown below
DDL information of the table
CREATE TABLE razorpay_payment (
id int(10) NOT NULL AUTO_INCREMENT,
name varchar(50) COLLATE utf8mb4_unicode_ci NOT NULL,
amount int(10) NOT NULL,
payment_status varchar(50) COLLATE utf8mb4_unicode_ci NOT NULL,
payment_id varchar(100) COLLATE utf8mb4_unicode_ci NOT NULL,
paid_on datetime NOT NULL,
PRIMARY KEY (id)
) ENGINE=MyISAM DEFAULT CHARSET=utf8mb4 COLLATE=utf8mb4_unicode_ci
Create a file process_payment.php to submit the payment details inside the database after successful payment.
<!DOCTYPE html>
<html lang="en">
<head>
  <title>Razorpay</title>
  <meta charset="utf-8">
  <meta name="viewport" content="width=device-width, initial-scale=1">
  <link href="https://cdn.jsdelivr.net/npm/bootstrap@5.2.3/dist/css/bootstrap.min.css" rel="stylesheet">
  <script src="https://cdn.jsdelivr.net/npm/bootstrap@5.2.3/dist/js/bootstrap.bundle.min.js"></script>
</head>
<body>

<div class="container mt-3" style="width: 50%;">
  <h2>Razorpay Payment Integration in PHP</h2>
  <form action="#">
    <div class="mb-3 mt-3">
      <label for="email">Payee Name:</label>
      <input type="email" class="form-control" id="name" placeholder="Enter Payee Name" name="payee_name">
    </div>
    <div class="mb-3">
      <label for="pwd">Amount:</label>
      <input type="number" class="form-control" id="amount" placeholder="Enter Amount" name="amount">
    </div>
    <div class="mb-3">
      <label for="pwd">Item Description:</label>
      <input type="text" class="form-control" id="description" placeholder="Enter Description" name="description">
    </div>
    <button type="button" class="btn btn-primary" id="rzp-button1" onclick="pay_now()">Pay</button>
  </form>
</div>

</body>
</html>
<script src="https://code.jquery.com/jquery-3.6.1.min.js"></script>
<script src="https://checkout.razorpay.com/v1/checkout.js"></script>
<script type="text/javascript">
    function pay_now(){
          //get the input from the form
          var name = $("#payee_name").val();
          var amount = $("#amount").val();
          var actual_amount = amount*100;
          var description = $('#description').val();
          //var actual_amount = amount;
          var options = {
            "key": "rzp_test_xx28KfXBaypeQW", // Enter the Key ID generated from the Dashboard
            "amount": actual_amount, // Amount is in currency subunits. Default currency is INR. Hence, 50000 refers to 50000 paise
            "currency": "INR",
            "name": name,
            "description": description,
            "image": "razorpay.png",
            //"order_id": "order_IluGWxBm9U8zJ8", //This is a sample Order ID. Pass the `id` obtained in the response of Step 1
            "handler": function (response){
                console.log(response);
                $.ajax({

                    url: 'process_payment.php',
                    'type': 'POST',
                    'data': {'payment_id':response.razorpay_payment_id,'amount':actual_amount,'name':name},
                    success:function(data){
                        console.log(data);
                      window.location.href = 'thank_you.php';
                    }

                });
                // alert(response.razorpay_payment_id);
                // alert(response.razorpay_order_id);
                // alert(response.razorpay_signature)
            },

        };
        var rzp1 = new Razorpay(options);
        rzp1.on('payment.failed', function (response){
                alert(response.error.code);
                alert(response.error.description);
                alert(response.error.source);
                alert(response.error.step);
                alert(response.error.reason);
                alert(response.error.metadata.order_id);
                alert(response.error.metadata.payment_id);
        });
        document.getElementById('rzp-button1').onclick = function(e){
            rzp1.open();
            e.preventDefault();
        }
    }
</script>
Explanation of the above code:-
- As soon as the form is submitted, we will get the input values using jquery and pass them to the options variable along with the key ID generated from the Razorpay dashboard.
- When you pass the input values using jquery then do not forget to multiply the amount by 100 because the currency is INR which means you are putting the amount as paisa which is why you need to multiply by 100.
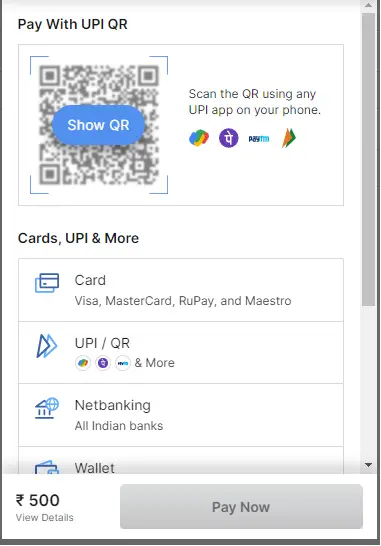
- Now, you will see a Razorpay interface after giving the phone number and email as shown below. Here you can view various options for payments.

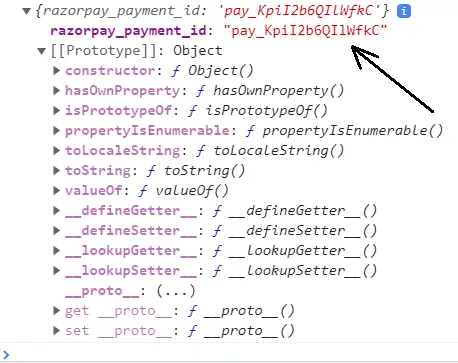
Now, inside the handler function, if you console the response then you will see the response values as shown below. Note that when you console then comment on the ajax request otherwise you can not see the response on the console.

Now we will use the razorpay_payment_id shown on the console and send it with the amount and payee name in the ajax request to the URL: process_payment.php.
Now, in the process_payment.php file, include your database connection file (dbconnect.php) as shown below
<?php
$servername='localhost';
$username="root";
$password="";
try
{
    $con=new PDO("mysql:host=$servername;dbname=myproject_db",$username,$password);
    $con->setAttribute(PDO::ATTR_ERRMODE,PDO::ERRMODE_EXCEPTION);
    //echo 'connected';
}
catch(PDOException $e)
{
    echo '<br>'.$e->getMessage();
}
?>
Now, inside the process_payment.php, get the razorpay_payment_id and other data sent from the ajax request and save them in the MySQL database as shown below
<?php
//connect the database
include 'dbconnect.php';

//get the payment details from payment page

if(isset($_POST['payment_id']) && isset($_POST['amount']) && isset($_POST['name']))
{
    $paymentId = $_POST['payment_id'];
    $amount = $_POST['amount'];
    $name = $_POST['name'];

    //insert data into database
    $sql="INSERT INTO razorpay_payment(name,amount,payment_status,payment_id)VALUES('$name','$amount','paid','$paymentId')";
    $stmt=$con->prepare($sql);
    $stmt->execute();
}
?>
Now, inside the success function, you can redirect to a thank you page after successful payment as shown below.
window.location.href = 'thank_you.php';
<!DOCTYPE html>
<html lang="en">
<head>
  <title>Bootstrap Example</title>
  <meta charset="utf-8">
  <meta name="viewport" content="width=device-width, initial-scale=1">
  <link href="https://cdn.jsdelivr.net/npm/bootstrap@5.2.3/dist/css/bootstrap.min.css" rel="stylesheet">
  <script src="https://cdn.jsdelivr.net/npm/bootstrap@5.2.3/dist/js/bootstrap.bundle.min.js"></script>
</head>
<body>

<div class="container mt-3">
  <div class="alert alert-success alert-dismissible">
    <button type="button" class="btn-close" data-bs-dismiss="alert"></button>
    <strong>Success!</strong> Payment Paid Successfully.
  </div>
</div>

</body>
</html>


