Razorpay payment gateway custom checkout
Sample codes to help you integrate the payment methods of your choice on Razorpay Checkout.
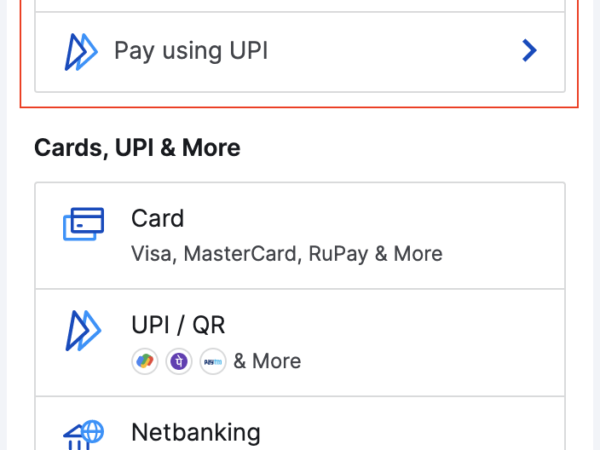
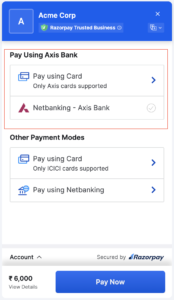
If you want to list all the payment methods offered by Axis bank, allow card payments for ICICI bank only and hide upi payment method from the Checkout, you can do so as follows:
<html>
<button id="rzp-button1" class="btn btn-outline-dark btn-lg"><i class="fas fa-money-bill"></i> Own Checkout</button>
<script src="https://checkout.razorpay.com/v1/checkout.js"></script>
<script>
  var options = {
    "key": "[YOUR_KEY_ID]", // Enter the Key ID generated from the Dashboard
    "amount": "1000",
    "currency": "INR",
    "description": "Acme Corp",
    "image": "https://s3.amazonaws.com/rzp-mobile/images/rzp.jpg",
    "prefill":
    {
      "email": "gaurav.kumar@example.com",
      "contact": +919900000000,
    },
    config: {
      display: {
        blocks: {
          utib: { //name for Axis block
            name: "Pay using Axis Bank",
            instruments: [
              {
                method: "card",
                issuers: ["UTIB"]
              },
              {
                method: "netbanking",
                banks: ["UTIB"]
              },
            ]
          },
          other: { //  name for other block
            name: "Other Payment modes",
            instruments: [
              {
                method: "card",
                issuers: ["ICIC"]
              },
              {
                method: 'netbanking',
              }
            ]
          }
        },
        hide: [
          {
          method: "upi"
          }
        ],
        sequence: ["block.utib", "block.other"],
        preferences: {
          show_default_blocks: false // Should Checkout show its default blocks?
        }
      }
    },
    "handler": function (response) {
      alert(response.razorpay_payment_id);
    },
    "modal": {
      "ondismiss": function () {
        if (confirm("Are you sure, you want to close the form?")) {
          txt = "You pressed OK!";
          console.log("Checkout form closed by the user");
        } else {
          txt = "You pressed Cancel!";
          console.log("Complete the Payment")
        }
      }
    }
  };
  var rzp1 = new Razorpay(options);
  document.getElementById('rzp-button1').onclick = function (e) {
    rzp1.open();
    e.preventDefault();
  }
</script>
</html>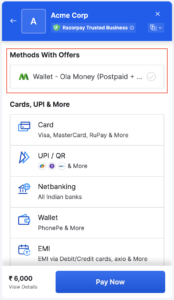
Show Ola Money Separately on Checkout
Use the code given below to show Ola Money separately on Checkout:
config: {
    display: {
      blocks: {
        banks: {
          name: 'Methods with Offers',
          instruments: [
            {
              method: 'wallet',
              wallets: ['olamoney']
            }]
        },
      },
      sequence: ['block.banks'],
      preferences: {
        show_default_blocks: true,
      },
    },
  },
};
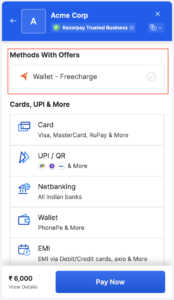
Show Freecharge Separately on Checkout
Use the code given below to show Freecharge separately on Checkout:
config: {
    display: {
      blocks: {
        banks: {
          name: 'Methods with Offers',
          instruments: [
            {
              method: 'wallet',
              wallets: ['freecharge']
            }]
        },
      },
      sequence: ['block.banks'],
      preferences: {
        show_default_blocks: true,
      },
    },
  },
};
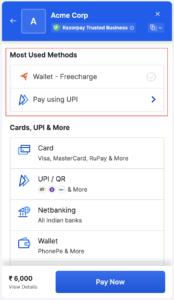
Show Most Used Methods
Use the code given below to show methods with offers:
config: {
    display: {
      blocks: {
        banks: {
          name: 'Most Used Methods',
          instruments: [
            {
              method: 'wallet',
              wallets: ['freecharge']
            },
            {
                method: 'upi'
            },
            ],
        },
      },
      sequence: ['block.banks'],
      preferences: {
        show_default_blocks: true,
      },
    },
  },
};
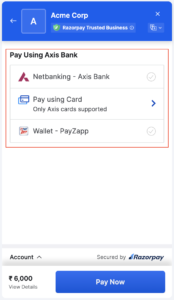
Show Instruments of a Certain Bank Only
Use the code given below to show the instruments of a certain bank only on Checkout:
config: {
    display: {
      blocks: {
        banks: {
          name: 'Pay using Axis bank',
          instruments: [
            {
              method: 'netbanking',
              banks: ['UTIB'],
            },
            {
              method: 'card',
              issuers: ['UTIB'],
            },
            {
                method: 'wallet',
                wallets:['payzapp']
            }
          ],
        },
      },
      sequence: ['block.banks'],
      preferences: {
        show_default_blocks: false,
      },
    },
  },
};
Highlight Instruments of a Certain Bank
Use the code given below to highlight the instruments of a certain bank only on Checkout:
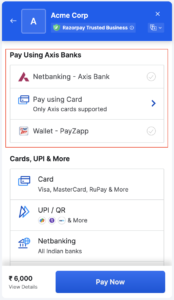
config: {
    display: {
      blocks: {
        banks: {
          name: 'Pay using Axis banks',
          instruments: [
            {
              method: 'netbanking',
              banks: ['UTIB'],
            },
            {
              method: 'card',
              issuers: ['UTIB'],
            },
            {
                method: 'wallet',
                wallets:['payzapp']
            }
          ],
        },
      },
      sequence: ['block.banks'],
      preferences: {
        show_default_blocks: true,
      },
    },
  },
};
Reorder Payment Methods
Use the code given below to reorder payment methods on Checkout:
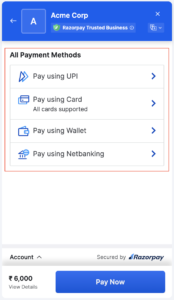
config: {
    display: {
      blocks: {
        banks: {
          name: 'All payment methods',
          instruments: [
            {
              method: 'upi'
            },
            {
              method: 'card'
            },
            {
                method: 'wallet'
            },
            {
                method: 'netbanking'
            }
          ],
        },
      },
      sequence: ['block.banks'],
      preferences: {
        show_default_blocks: false,
      },
    },
  },
};
Remove a Method from Checkout
Use the code given below to remove a method from Checkout:
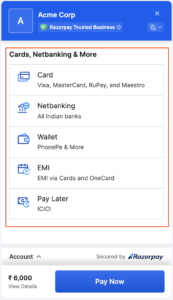
config: {
    display: {
      hide: [
        {
          method: 'upi'
        }
      ],
      preferences: {
        show_default_blocks: true,
      },
    },
  },
};
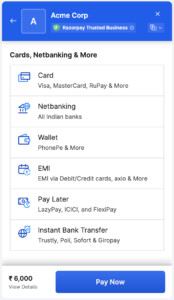
Show Only a Certain Payment Method on Checkout
Use the code given below to show only a certain payment method on Checkout:
config: {
    display: {
      blocks: {
        banks: {
          name: 'Pay via UPI',
          instruments: [
            {
              method: 'upi'
            }
          ],
        },
      },
      sequence: ['block.banks'],
      preferences: {
        show_default_blocks: false,
      },
    },
  },
};
Card
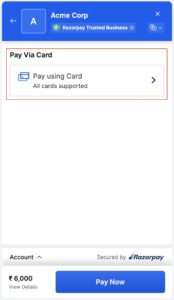
config: {
    display: {
      blocks: {
        banks: {
          name: 'Pay via Card',
          instruments: [
            {
              method: 'card'
            }
          ],
        },
      },
      sequence: ['block.banks'],
      preferences: {
        show_default_blocks: false,
      },
    },
  },
};Paytm Payment Gateway Integration in PHP
In this tutorial, we have explained Paytm Payment Gateway Integration in PHP programming language. In today scenario Paytm is the most popular and trusted mobile wallet system. As per the Economic time’s survey Paytm reached approx 200 million registered users. Yes, that is a huge number.
After demonetization in India, Paytm become more popular. Now, most of the users pay Bills and transfer money via the Paytm service. It’s very easy to use and of course very fast.
Today many eCommerce or other service websites start using Paytm payment gateway. Its also reduce the risk to exposing credit card details or banking password. Just send or receive payment via your Mobile Phone. So, no doubt Paytm is a better service for online payment for your Website or Mobile App.
Steps to Integrate Paytm Payment Gateway in PHP
Let’s start the process of Paytm Payment Gateway Integration. It’s very easy to integrate in your application as compared to other payment gateways. Follow the below steps:
Step 1 : Register for Paytm Account
Sign Up for a Paytm business account from here: https://paytm.com/business/payments/online
During Sign up process, you need to choose the option that Paytm Payment Gateway requires for a Website or APP. Also submit a valid Redirect URL, where you want to redirect the user after successful payment received.
In the registration process, they ask for some official information like Business Types, addresses, Verification proof, Bank Details, etc. Although you can get Paytm sandbox credential without complete this process. But for production, you have to provide all required information.
After this, you will get Paytm Staging Credentials, which included Staging MID, Merchant Key, Industry Type, Website Name, and Channel ID. Paytm also send testing wallet details, which you can use for test transaction flow.
Note: All users must use Paytm with only an Indian registered number because the company hasn’t gone overseas except for Canada.
Step 2 : Download Official Paytm PHP Kit
Paytm official announced library source code in all languages. Just download Paytm Payment Gateway kit in PHP from GitHub. Extract the Zip file, there is the ‘PaytmKit’ folder which has all required files.
Step 3: Configure Paytm Credential
Open ‘config_paytm.php’ file in PaytmKit -> lib folder and update with the access credential you got from Paytm.
define('PAYTM_ENVIRONMENT', 'TEST'); // change value PROD for production
define('PAYTM_MERCHANT_KEY', 'vsbi51****uKL0#3 ');
define('PAYTM_MERCHANT_MID', 'codefi*****858443');
define('PAYTM_MERCHANT_WEBSITE', 'WEBS***ING');
By default source code ready for staging site. When you want to move to Production update the ‘PAYTM_ENVIRONMENT’ value by ‘PROD’.
Step 4: Create HTML Payment Form
After configuring the credential, your code is ready to process. Now create an HTML form to make the online transactions.
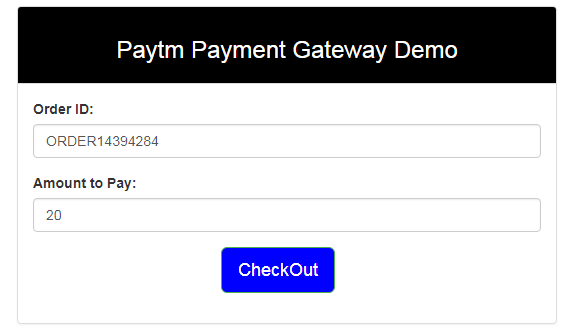
Form action should be to this file ‘pgRedirect.php’ inside PaytmKit folder. This file handle checksum and other require details and redirect to you Paytm payment page. After click on checkout button user can process the payment via the paytm wallet.
<!doctype html>
<html>
<head>
<title>Patym Payment Gateway Integration in PHP</title>
    <link href="https://maxcdn.bootstrapcdn.com/bootstrap/3.3.7/css/bootstrap.min.css" type="text/css" rel="stylesheet" />
</head>
<body>
<div class="container" style="padding-top:100px;">
    <div class="col-xs-6 col-xs-offset-3">
        <div class="panel panel-default">
            <div style="background-color: #000000; color:#fff" class="panel-heading">
                <h3 class="text-center">Paytm Payment Gateway Demo</h3>
            </div>
            <div class="panel-body">
            <form action="pgRedirect.php" method="post">
				<input type="hidden" id="CUST_ID" name="CUST_ID" value="CUST001">
					<input type="hidden" id="INDUSTRY_TYPE_ID" name="INDUSTRY_TYPE_ID" value="Retail">
					<input type="hidden"  id="CHANNEL_ID" name="CHANNEL_ID" value="WEB">
                <div class="form-group">

					<label>Order ID:</label>
                    <input type="text" class="form-control" id="ORDER_ID" name="ORDER_ID" size="20" maxlength="20" autocomplete="off"

tabindex="1" value="<?php echo  "ORDER" . rand(10000,99999999)?>">
                </div>

                <div class="form-group">
					<label>Amount to Pay:</label>
                    <input type="text" class="form-control" id="TXN_AMOUNT" name="TXN_AMOUNT" autocomplete="off" tabindex="5"

value="20">
                </div>
                <div class="form-group">
                    <input type="submit" name="submit" value="CheckOut" class="btn btn-success btn-lg" style="background-

color:#0000FF; margin-left: 37%;">
                </div>
            </form>
            </div>
        </div>
    </div>
</div>
</body>
</html>
In this form we are sending some required parameter as hidden variable like Channel ID, Industry Type and Customer ID. You have to pass these parameters along with form submit.
Razorpay payment gateway integration in PHP
create a folder inside the root directory of your local server.
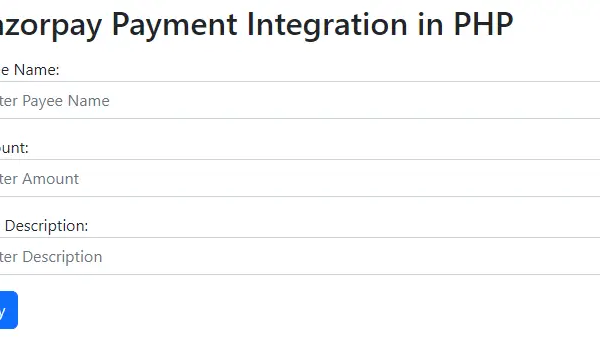
create a file (index.php) inside that folder along with some inputs such as payee name, amount, and item description as shown below
<!DOCTYPE html>
<html lang="en">
<head>
  <title>Razorpay</title>
  <meta charset="utf-8">
  <meta name="viewport" content="width=device-width, initial-scale=1">
  <link href="https://cdn.jsdelivr.net/npm/bootstrap@5.2.3/dist/css/bootstrap.min.css" rel="stylesheet">
  <script src="https://cdn.jsdelivr.net/npm/bootstrap@5.2.3/dist/js/bootstrap.bundle.min.js"></script>
</head>
<body>

<div class="container mt-3" style="width: 50%;">
  <h2>Razorpay Payment Integration in PHP</h2>
  <form action="#">
    <div class="mb-3 mt-3">
      <label for="email">Payee Name:</label>
      <input type="email" class="form-control" id="name" placeholder="Enter Payee Name" name="payee_name">
    </div>
    <div class="mb-3">
      <label for="pwd">Amount:</label>
      <input type="number" class="form-control" id="amount" placeholder="Enter Amount" name="amount">
    </div>
    <div class="mb-3">
      <label for="pwd">Item Description:</label>
      <input type="text" class="form-control" id="description" placeholder="Enter Description" name="description">
    </div>
    <button type="button" class="btn btn-primary" id="rzp-button1" onclick="pay_now()">Pay</button>
  </form>
</div>
</body>
</html>
Paste the javascript code inside the index.php file as shown below
<script src="https://code.jquery.com/jquery-3.6.1.min.js"></script>
<script src="https://checkout.razorpay.com/v1/checkout.js"></script>
<script type="text/javascript">
    function pay_now(){
          //get the input from the form
          var name = $("#payee_name").val();
          var amount = $("#amount").val();
          var actual_amount = amount*100;
          var description = $('#description').val();
          //var actual_amount = amount;
          var options = {
            "key": "rzp_test_xx28KfXBaypeQW", // Enter the Key ID generated from the Dashboard
            "amount": actual_amount, // Amount is in currency subunits. Default currency is INR. Hence, 50000 refers to 50000 paise
            "currency": "INR",
            "name": name,
            "description": description,
            "image": "razorpay.png",
            //"order_id": "order_IluGWxBm9U8zJ8", //This is a sample Order ID. Pass the `id` obtained in the response of Step 1
            "handler": function (response){
                console.log(response);
                $.ajax({

                    url: 'process_payment.php',
                    'type': 'POST',
                    'data': {'payment_id':response.razorpay_payment_id,'amount':actual_amount,'name':name},
                    success:function(data){
                        console.log(data);
                      window.location.href = 'thank_you.php';
                    }

                });
                // alert(response.razorpay_payment_id);
                // alert(response.razorpay_order_id);
                // alert(response.razorpay_signature)
            },

        };
        var rzp1 = new Razorpay(options);
        rzp1.on('payment.failed', function (response){
                alert(response.error.code);
                alert(response.error.description);
                alert(response.error.source);
                alert(response.error.step);
                alert(response.error.reason);
                alert(response.error.metadata.order_id);
                alert(response.error.metadata.payment_id);
        });
        document.getElementById('rzp-button1').onclick = function(e){
            rzp1.open();
            e.preventDefault();
        }
    }
</script>
Establish the database connection in PHP so that you can insert the data with the Razorpay payment id.
Create a table in your database as shown below
DDL information of the table
CREATE TABLE razorpay_payment (
id int(10) NOT NULL AUTO_INCREMENT,
name varchar(50) COLLATE utf8mb4_unicode_ci NOT NULL,
amount int(10) NOT NULL,
payment_status varchar(50) COLLATE utf8mb4_unicode_ci NOT NULL,
payment_id varchar(100) COLLATE utf8mb4_unicode_ci NOT NULL,
paid_on datetime NOT NULL,
PRIMARY KEY (id)
) ENGINE=MyISAM DEFAULT CHARSET=utf8mb4 COLLATE=utf8mb4_unicode_ci
Create a file process_payment.php to submit the payment details inside the database after successful payment.
<!DOCTYPE html>
<html lang="en">
<head>
  <title>Razorpay</title>
  <meta charset="utf-8">
  <meta name="viewport" content="width=device-width, initial-scale=1">
  <link href="https://cdn.jsdelivr.net/npm/bootstrap@5.2.3/dist/css/bootstrap.min.css" rel="stylesheet">
  <script src="https://cdn.jsdelivr.net/npm/bootstrap@5.2.3/dist/js/bootstrap.bundle.min.js"></script>
</head>
<body>

<div class="container mt-3" style="width: 50%;">
  <h2>Razorpay Payment Integration in PHP</h2>
  <form action="#">
    <div class="mb-3 mt-3">
      <label for="email">Payee Name:</label>
      <input type="email" class="form-control" id="name" placeholder="Enter Payee Name" name="payee_name">
    </div>
    <div class="mb-3">
      <label for="pwd">Amount:</label>
      <input type="number" class="form-control" id="amount" placeholder="Enter Amount" name="amount">
    </div>
    <div class="mb-3">
      <label for="pwd">Item Description:</label>
      <input type="text" class="form-control" id="description" placeholder="Enter Description" name="description">
    </div>
    <button type="button" class="btn btn-primary" id="rzp-button1" onclick="pay_now()">Pay</button>
  </form>
</div>

</body>
</html>
<script src="https://code.jquery.com/jquery-3.6.1.min.js"></script>
<script src="https://checkout.razorpay.com/v1/checkout.js"></script>
<script type="text/javascript">
    function pay_now(){
          //get the input from the form
          var name = $("#payee_name").val();
          var amount = $("#amount").val();
          var actual_amount = amount*100;
          var description = $('#description').val();
          //var actual_amount = amount;
          var options = {
            "key": "rzp_test_xx28KfXBaypeQW", // Enter the Key ID generated from the Dashboard
            "amount": actual_amount, // Amount is in currency subunits. Default currency is INR. Hence, 50000 refers to 50000 paise
            "currency": "INR",
            "name": name,
            "description": description,
            "image": "razorpay.png",
            //"order_id": "order_IluGWxBm9U8zJ8", //This is a sample Order ID. Pass the `id` obtained in the response of Step 1
            "handler": function (response){
                console.log(response);
                $.ajax({

                    url: 'process_payment.php',
                    'type': 'POST',
                    'data': {'payment_id':response.razorpay_payment_id,'amount':actual_amount,'name':name},
                    success:function(data){
                        console.log(data);
                      window.location.href = 'thank_you.php';
                    }

                });
                // alert(response.razorpay_payment_id);
                // alert(response.razorpay_order_id);
                // alert(response.razorpay_signature)
            },

        };
        var rzp1 = new Razorpay(options);
        rzp1.on('payment.failed', function (response){
                alert(response.error.code);
                alert(response.error.description);
                alert(response.error.source);
                alert(response.error.step);
                alert(response.error.reason);
                alert(response.error.metadata.order_id);
                alert(response.error.metadata.payment_id);
        });
        document.getElementById('rzp-button1').onclick = function(e){
            rzp1.open();
            e.preventDefault();
        }
    }
</script>
Explanation of the above code:-
- As soon as the form is submitted, we will get the input values using jquery and pass them to the options variable along with the key ID generated from the Razorpay dashboard.
- When you pass the input values using jquery then do not forget to multiply the amount by 100 because the currency is INR which means you are putting the amount as paisa which is why you need to multiply by 100.
- Now, you will see a Razorpay interface after giving the phone number and email as shown below. Here you can view various options for payments.
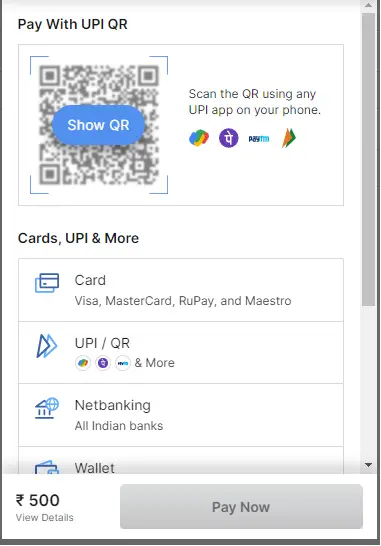
Now, inside the handler function, if you console the response then you will see the response values as shown below. Note that when you console then comment on the ajax request otherwise you can not see the response on the console.
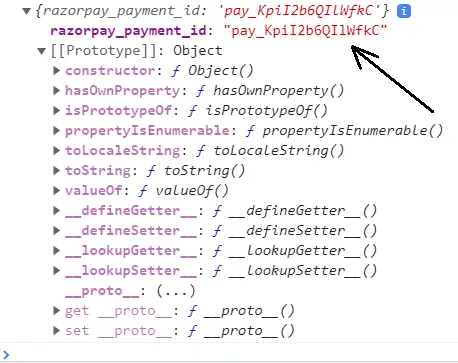
Now we will use the razorpay_payment_id shown on the console and send it with the amount and payee name in the ajax request to the URL: process_payment.php.
Now, in the process_payment.php file, include your database connection file (dbconnect.php) as shown below
<?php
$servername='localhost';
$username="root";
$password="";
try
{
    $con=new PDO("mysql:host=$servername;dbname=myproject_db",$username,$password);
    $con->setAttribute(PDO::ATTR_ERRMODE,PDO::ERRMODE_EXCEPTION);
    //echo 'connected';
}
catch(PDOException $e)
{
    echo '<br>'.$e->getMessage();
}
?>
Now, inside the process_payment.php, get the razorpay_payment_id and other data sent from the ajax request and save them in the MySQL database as shown below
<?php
//connect the database
include 'dbconnect.php';

//get the payment details from payment page

if(isset($_POST['payment_id']) && isset($_POST['amount']) && isset($_POST['name']))
{
    $paymentId = $_POST['payment_id'];
    $amount = $_POST['amount'];
    $name = $_POST['name'];

    //insert data into database
    $sql="INSERT INTO razorpay_payment(name,amount,payment_status,payment_id)VALUES('$name','$amount','paid','$paymentId')";
    $stmt=$con->prepare($sql);
    $stmt->execute();
}
?>
Now, inside the success function, you can redirect to a thank you page after successful payment as shown below.
window.location.href = 'thank_you.php';
<!DOCTYPE html>
<html lang="en">
<head>
  <title>Bootstrap Example</title>
  <meta charset="utf-8">
  <meta name="viewport" content="width=device-width, initial-scale=1">
  <link href="https://cdn.jsdelivr.net/npm/bootstrap@5.2.3/dist/css/bootstrap.min.css" rel="stylesheet">
  <script src="https://cdn.jsdelivr.net/npm/bootstrap@5.2.3/dist/js/bootstrap.bundle.min.js"></script>
</head>
<body>

<div class="container mt-3">
  <div class="alert alert-success alert-dismissible">
    <button type="button" class="btn-close" data-bs-dismiss="alert"></button>
    <strong>Success!</strong> Payment Paid Successfully.
  </div>
</div>

</body>
</html>How to redirect HTTP to HTTPS
How to redirect HTTP to HTTPS Using .htaccess
Chrome and Firefox have started showing insecure warnings on sites without SSL certificates. Without SSL, your website will show insecure to the visitors. Therefore, using an SSL-encrypted connection for safety, accessibility or PCI compliance reasons is necessary. It becomes very important to redirect from HTTP to HTTPS.
What is SSL?
SSL stands for Secure Sockets Layer. It was one of the early protocols developed for secure communication over the internet. SSL provides a secure and encrypted connection between a client and a server, ensuring that data transmitted between them remains confidential and cannot be intercepted or tampered with by unauthorized parties.
SSL uses a combination of cryptographic algorithms to establish an encrypted connection. When a client (such as a web browser) initiates a connection with a server that supports SSL, they go through a process called the SSL handshake. During the handshake, the client and server exchange information and negotiate the encryption parameters for the session.
Once the SSL handshake is complete, a secure connection is established, and data exchanged between the client and server is encrypted using symmetric encryption. This means that even if someone manages to intercept the data, they cannot understand its contents without the encryption key.
SSL has been widely used for securing sensitive information, such as credit card details, login credentials, and personal information, transmitted over the internet. However, it has been succeeded by the newer Transport Layer Security (TLS) protocol, which is an enhanced version of SSL. TLS is backward-compatible with SSL, and the terms “SSL” and “TLS” are often used interchangeably in practice.
It’s worth noting that SSL/TLS is primarily used for securing the connection between a client (e.g., a web browser) and a server. It does not guarantee the security of the server or the application running on it. Additional security measures and best practices need to be implemented to ensure the overall security of the server and the data it holds.
Why SSL is Critical?
SSL (Secure Sockets Layer) or its successor TLS (Transport Layer Security) is critical for several reasons:
- Confidentiality: SSL ensures the confidentiality of data transmitted over the internet. By encrypting the communication between a client and a server, SSL prevents unauthorized parties from intercepting and understanding the content of the data. This is crucial when transmitting sensitive information such as credit card details, login credentials, or personal data.
- Data Integrity: SSL provides data integrity, ensuring that the information exchanged between the client and server remains intact and unaltered during transmission. Through the use of cryptographic algorithms, SSL verifies that the data received at the destination is the same as the data sent by the source. This helps to prevent data tampering or modification by malicious entities.
- Authentication: SSL supports server authentication, which allows clients to verify the identity of the server they are communicating with. When a server presents an SSL certificate signed by a trusted certificate authority (CA), the client can be confident that they are connecting to the legitimate server and not an impostor. This helps prevent man-in-the-middle attacks where an attacker intercepts the communication and poses as the server.
- Trust and Confidence: SSL helps establish trust and confidence between users and websites or online services. When users see the padlock icon or the “https://” prefix in their browser’s address bar, it indicates that the connection is secured with SSL/TLS. This visual indicator reassures users that their interactions are protected, which is particularly important for e-commerce websites, online banking, or any site that deals with sensitive information.
- Regulatory Compliance: SSL/TLS is often a requirement for compliance with various industry standards and regulations. For example, the Payment Card Industry Data Security Standard (PCI DSS) mandates the use of SSL/TLS to protect credit card data during transmission. Compliance with such standards is crucial for businesses that handle sensitive customer information to avoid penalties and maintain customer trust.
Overall, SSL is critical because it provides encryption, data integrity, authentication, and establishes trust in online communications. By implementing SSL/TLS, organizations can enhance the security of their online services and protect sensitive data, fostering a safer environment for users.
In order to force your web traffic to use HTTPS, edit the codes in the .htaccess file.
Before we move onto redirecting HTTP to HTTPS, here’s how you can edit .htaccess file. If you already know skip to Redirection steps.
Editing .htaccess File
There are instructions/directives in the .htaccess file that tell the server how to act in certain scenarios and directly affects how your website functions. Common directives in .htaccess file:
- Redirects
- Rewriting URLs
Ways to edit an .htaccess file:
- Edit the file on your computer and upload it to the server using FTP.
- Use “Edit” mode in FTP program that allows you to edit a file remotely.
- Use a text editor and SSH to edit the file.
- Use the File Manager in cPanel to edit the file.
Editing .htaccess in cPanel File Manager
- Login to cPanel
- Files > File Manager > Document Root for:
- Now select the domain name you want to access
- Check “Show Hidden Files (dotfiles)”
- Click “Go”
- After a new tab or window opens, look for the .htaccess file.
- Right click on the .htaccess file and click on “Code Edit” on the menu.
- A dialogue box may pop up asking about encoding. Click “Edit” button to continue.
- Edit the file
- “Save Changes” when done.
- Test your website to make sure it is done correctly. In case, there is an error, restore to the previous version and try again.
- Once you are done, click “Close” to close the window.
Redirecting HTTP to HTTPS
- Redirect All Web Traffic
If you have existing code in your .htaccess, add the following:
RewriteEngine On
RewriteCond %{SERVER_PORT} 80
RewriteRule ^(.*)$ https://www.yourdomain.com/$1 [R,L]- Redirect Only a Specific Domain
For redirecting a specific domain to use HTTPS, add the following:
RewriteEngine On
RewriteCond %{HTTP_HOST} ^yourdomain\.com [NC]
RewriteCond %{SERVER_PORT} 80
RewriteRule ^(.*)$ https://www.yourdomain.com/$1 [R,L]- Redirect Only a Specific Folder
Redirecting to HTTPS on a specific folder, add the following:
RewriteEngine On
RewriteCond %{SERVER_PORT} 80
RewriteCond %{REQUEST_URI} folder
RewriteRule ^(.*)$ https://www.yourdomain.com/folder/$1 [R,L]
Note: Replace “yourdomain” with your actual domain name wherever required. Also, in case of the folder, replace /folder with the actual folder name.
HTTP to HTTPS redirect refers to the process of automatically redirecting a user’s request from an insecure HTTP connection to a secure HTTPS connection. This redirection is important for several reasons:
- Security: HTTPS utilizes SSL/TLS encryption to secure the communication between the client and the server. By redirecting from HTTP to HTTPS, you ensure that sensitive information, such as login credentials or financial data, is transmitted securely, reducing the risk of eavesdropping, tampering, or data interception.
- Data Integrity: HTTPS ensures the integrity of data during transmission. By redirecting to HTTPS, you prevent attackers from modifying the content of the communication, as SSL/TLS verifies the integrity of the data exchanged between the client and server.
- Trust and User Confidence: Users have come to associate HTTPS with secure and trustworthy websites. When a user sees the padlock icon and “https://” in the browser’s address bar, it instills confidence that their connection is encrypted and their data is protected. By redirecting to HTTPS, you provide a positive user experience and build trust with your visitors.
To implement an HTTP to HTTPS redirect, you typically need to configure your web server or website to automatically redirect incoming HTTP requests to the corresponding HTTPS URL. This can usually be achieved through server-side configurations or using code directives.
For example, if you’re using the Apache HTTP Server, you can add the following code to your .htaccess file:
RewriteEngine On
RewriteCond %{HTTPS} !=on
RewriteRule ^ https://%{HTTP_HOST}%{REQUEST_URI} [L,R=301]
This code checks if the incoming request is not using HTTPS and redirects it to the HTTPS version of the URL.
Similarly, other web servers like Nginx or IIS have their own configuration mechanisms for performing the redirect.
It’s important to note that implementing the redirect requires an SSL/TLS certificate to be installed on the server to enable HTTPS. Without a valid certificate, the redirect will not work, and users may encounter warnings or errors when attempting to access your website.
Think it was helpful? Share this article to help others come on HTTPS.
AePS Cash Withdrawal API
AePS via SDK is a simple and highly secure cash withdrawal system developed by NPCI for Indians using their Aadhaar linked bank accounts.
Build your own ATM network
Aadhaar Enabled Payment System (AePS)
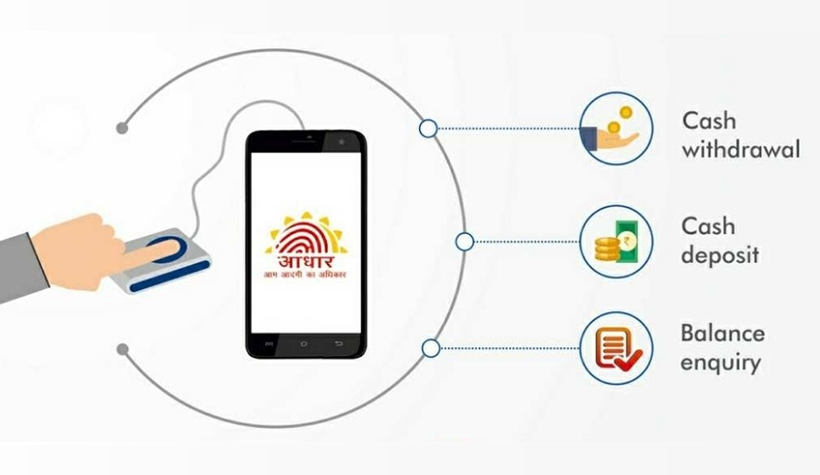
AePS allows a customer to use Aadhaar and access their bank account to perform basic banking transactions like cash-deposit, cash-withdrawal, intrabank or interbank fund-transfer, balance-inquiry, and access their mini statement with just their fingerprint.
Easy AePS Cash Withdrawal
AePS API allows your retailers to turn their shop into an ATM and let customers withdraw cash using their Aadhaar & fingerprint.
Jan Dhan Government Benefit
AePS allows your customers to withdraw their DBT (Direct Benefit Transfers) from government in their Jan Dhan account.
Easy Cash Deposit
AePS API also allows retailers to turn their shop into a cash deposit machine. Customers can then deposit cash at their shop with ease.
Quick Fund Transfer
With AePS API customers will never have to go to a Bank or an ATM and they will not need a debit card also. Just transfer funds using fingerprint.
Instant Balance-inquiry
AePS API allows customers to check their bank balance at a retailer’s shop instantly.
Mini Statement
AePS API will also let customers take the mini statement of their account at a retailer’s shop.
Best AEPS & Open Banking API Providers In India
ICICI Bank
ICICI Bank comes first when discussing about the best AEPS API providers in India.
They issued a statement about the launch of its API Banking portal in January 2010. The API Developer Portal enables partner companies to co-create solutions in a hassle-free manner. ICICI bank AEPS API allows the user to offer all the banking services to the customers in a very convenient way.
This API allows the user to make transactions using the Aadhaar Card number and biometric verification of the account holder. The ICICI Bank API Banking Portal consists of 250 APIs enabling business, fin-tech, corporates, and e-commerce start-ups to partner with the bank.
The APIs are a set of instructions, which allow the third-party applications to communicate with the bank’s various applications and collaborate to bring in new customer propositions.
They are available across an array of categories including payments and collections such as IMPS, UPI payment/ collection, accounts & deposits, and cards & loans.
After testing the solution on the sandbox environment, developers can upgrade to the UAT environment for end-to-end real-time testing, post-signing an NDA with the bank.
Yes Bank
The bank started the YES Fin-tech developer portal in November 2019. The API sandbox consists of over 50 virtual APIs and is in line with the bank’s strategy of keeping customers at the core while ideating and co-creating solutions.
The sandbox builds on the bank’s strategy of using API banking as corporates, MSMEs, and start-ups to identify best-fit APIs based on their sectors and also allows them to test the APIs with their app in a secure environment.
The sandbox enables clients across sectors an enabler to customize digital solutions for its clients. This helps to visualize multiple banking use cases customized for their application and understand possible integrations and functionalities of the bank’s APIs.
YES Fin-tech Developer provides a boost to the bank’s effort of co-creating innovations with Fin-Techs, startups, and the developer ecosystem to enhance the customer experience.
Developers can complete integrations in the environment and mimic how their solutions would work in a ‘live’ environment. Once they are comfortable, they can move to subscribe to the APIs.
Through the sandbox, YES BANK will grant access to APIs across 4 usage categories including account management, payments, cards, and CRM.
Airtel Payments Bank
The payment interface of Airtel payment AOI allows an application to perform all the payment operations under one platform. Transform your business with digital payments services using Airtel Payments API.
API seva is one of the best AEPS API provider company in India providing at a reasonable cost.
This API revolves around providing Content Providers with the facility to charge their customers for the products and services registered via the Subscription Provisioning Portal provided by Smart API Platform.
Activation and deactivation of these subscription payment plans are managed by Airtel’s Subscription Engine which is integrated with the Smart API Platform.
api api docs Cheapest UTI PSA Retailer Create Your UPI QR Code Distributor free api Free UPI Payment Gateway Free UPI QR Code how to integrate paytm payment gateway in wordpress how to integrate paytm payment gateway in your website how to integrate razorpay payment gateway in php html Master Distributor MySQL pan card api Pan Card APIs payment gateway payment gateway integration payment gateway integration in php Payout api docs Paytm paytm integration paytm payment gateway paytm payment gateway in php paytm payment gateway integration paytm payment gateway integration in php paytm payment gateway integration in php in hindi php PHP Free Source Code razorpay payment gateway razorpay payment gateway integration razorpay payment gateway integration in php razorpay payment gateway integration in wordpress Recharge API Recharge API Docs Recharge Software With Source Code Source Code Test Instruments – Payment Gateway UPI Pay upi payment gateway UPI QR Code utiitsl uti pan card api uti psa api Whitelabel Payment Gateway
Pan Card Coupon

Dear Sir/Mam,
Now we have start cheapest cost coupon portal instant coupon & instant id.
Retailer One time registration fee INR 199
Coupon Cost INR 97
Distributor one time registration fee INR 499
Coupon Cost INR 96
Master Distributor one time registration fee INR 999
Coupon Cost INR 95

